
Discover the SKYTTA sliding door system
No matter how big or small your home is, there are always challenges. Perhaps there is not enough storage space or you are looking for a way to make the best use of your open layout.
With the SKYTTA sliding door system you can easily create a workplace in the living room or a spacious walk-in closet in the bedroom. Get to know the SKYTTA system and learn how to create a solution for yourself step by step.
Note: Installing SKYTTA is a project for someone with some DIY experience. So dive into this project yourself or ask your dearest handy person to help. There are assembly videos at the bottom of the page to help you get started.

SKYTTA sliding doors in five steps


Step 1: Measure your space
The doors are available in two heights, but even if the height at your home is slightly lower or much higher, we have a solution. The heights are 196cm and 231cm.
Measure the width (1, 2) and height (A, B, C) of your room. Be sure to measure the height in at least three places as the ceiling or floor may be slightly uneven. It is important that you measure the exact location where you will be placing the doors and that every surface is straight.
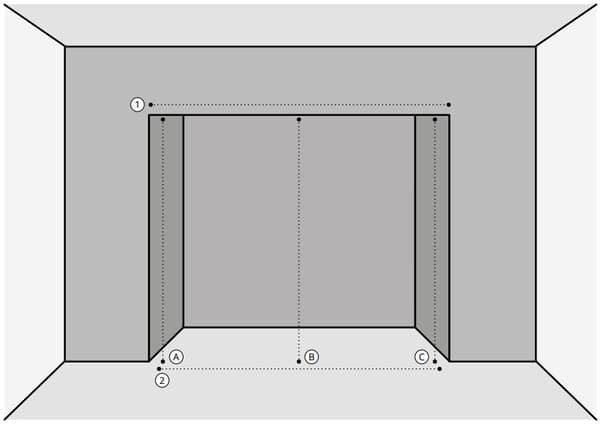
Uneven or sloping surfaces will need to be adjusted before the doors are installed, for example if you are installing SKYTTA sliding doors against a sloping roof. Don't forget floor or ceiling skirting boards. We recommend always removing or cutting them, otherwise a gap will be created between the door and the wall. It is also possible to use a stop bar.
Step 2: Ceilings, walls, sloping ceilings
Does your ceiling height not match the height of the SKYTTA sliding doors? No problem! We have different solutions.
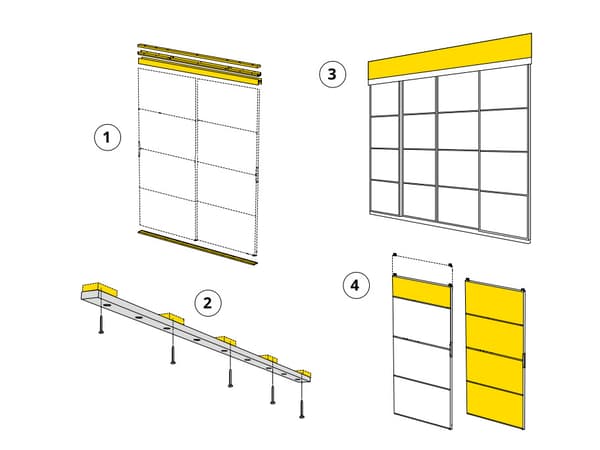
The correct distance between ceiling and floor:
Image 1) The doors fit perfectly
Low door: distance from ceiling to floor is 2039-2051 mm
High door: distance from ceiling to floor is 2391-2403 mm
You can install the doors without additional adjustments. Use the corresponding rails for this. The rails add 9 cm to the height of the doors and can be adjusted +/- 6 mm.
Image 2) There is a little bit of space left
Low door: distance from ceiling to floor is 2052-2095 mm
High door: distance from ceiling to floor is 2404-2447 mm
Compensate for the ceiling height with spacers against the ceiling (these are not available from IKEA).
Image 3) There is too much space left
Low door: distance from ceiling to floor is 2075-2410 mm
High door: distance from ceiling to floor is 2427-2762 mm
Compensate for the lack of ceiling height with SKYTTA height adjusters and SKYTTA panels, or contact a carpenter for a tailor-made solution.
Image 4) The doors are too high
Low door: distance from ceiling to floor is 1500-2038 mm
High door: distance from ceiling to floor is 1500-2390 mm
It is possible to trim the doors and panels. However, this option does not apply to glass or mirror glass panels. This should be carried out by a professional carpenter with the correct tools.
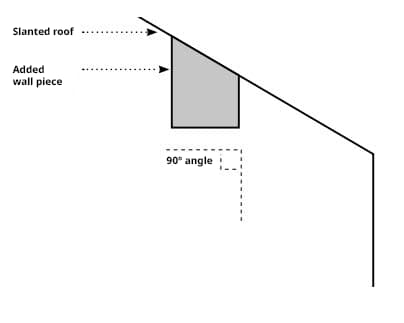
Planning for sloping ceilings
The SKYTTA ceiling rails must be mounted on a flat surface parallel to the floor. The rails cannot be mounted directly on a sloping ceiling. If you want to install SKYTTA on a sloped ceiling, an additional piece of wall must be added that is wider than the width of the rails, forming a 90 degree angle to the wall.
Step 3: Choose the door width and panels
You can choose from two door widths
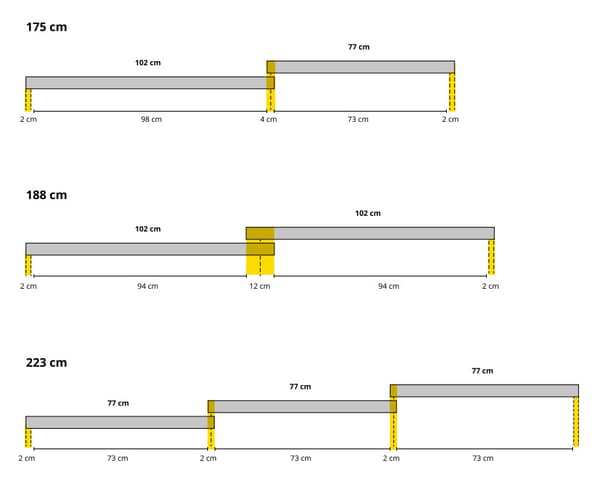
The doors are placed next to each other with a slight overlap, so that there is no gap between them. Therefore, the width of the door should be slightly smaller than the door opening. SKYTTA is available in 77 cm or 102 cm wide.
The formula for the width:
98 cm × the number of doors of 102 cm wide
+ 73 cm × the number of doors of 77 cm wide
+ 4 cm = the total width of the solution
The extra 4 cm is to compensate for the fact that there is no overlap at the ends of the solution. See the table with the most common combinations and the total overall width already calculated.
These widths are calculated using the recommended overlap. If the space is only a few inches narrower, a little more overlap is possible; or less overlap for a wider space. Remember that greater overlap may be visible through glass doors.
Calculate the total width:
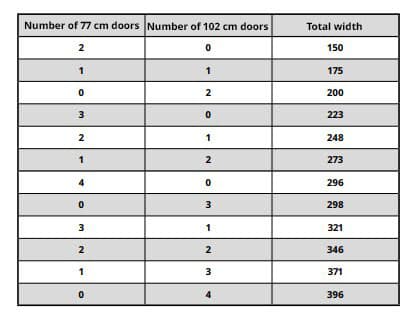
Examples of combinations:
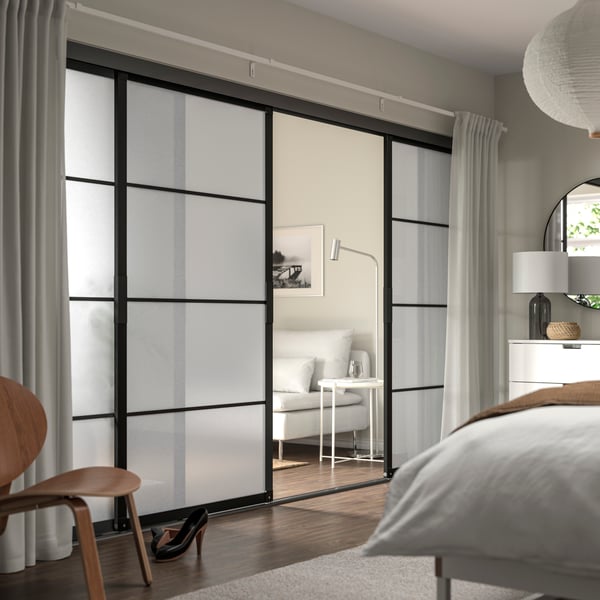
Choose colors and panels
The SKYTTA sliding door frames are available in white, aluminum and black and can be combined with all panels of the PAX series. Go for a solution that blends in with your interior or create striking contrasts.
The panels are sold in packs of 4, which means you need one pack of panels for each SKYTTA door. Choose and combine colours, materials and finishes.
Please note that some panels on the back may have a different color or finish. This is especially important for a solution where you will see the doors from both sides.
For detailed information about the appearance and material of the panels, it is best to contact an IKEA employee in the store or schedule an appointment via our planning service.
- Product information page
Step 4: Choose the number and colour of rails

Once you have chosen the number of doors, you can also choose the number of rails. Each rail is 2m long and can be joined to the correct length or cut for the correct width. They are available in the same design as the frames: white, aluminum and black.
The rails are available in two versions, a 2-track and a 3-track. If you have opted for 3 doors, we recommend using 3-lane, so that you can slide all three doors one behind the other and open the doors widely. If you have chosen 2, 4 or more doors, we recommend 2-track rails.
The SKYTTA door frames and rails come in black, white, or aluminium finish.Pick the colour that best suits your style!
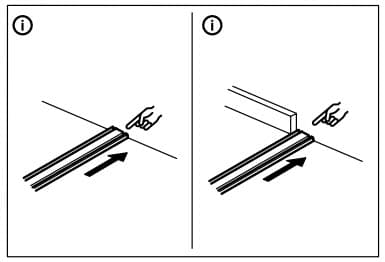
Step 5: Frame the doors with a stopper
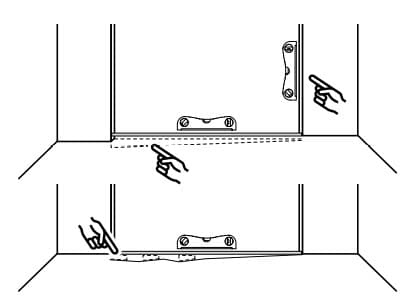
A stopper is a good way to create a frame around the sliding doors and give the wall extra protection. The stopper can be placed over the skirting board or mounted between it, as shown in the image.
Our SKYTTA stopper is available in white and is available in two widths to match the rails. This is 18 mm thick and 240 cm high and can be trimmed if possible for the correct height.
Cut the floor and ceiling skirting boards so that the stopper fits between the floor and ceiling. The stopper can be placed above the skirting board. In that case, measure the baseboard, because the thickness varies by brand and style.
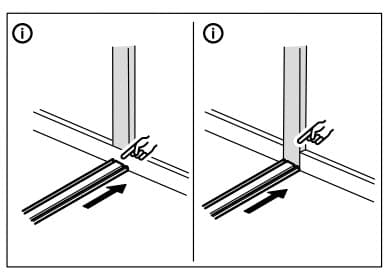
It is possible to use the doors without the SKYTTA stopper as shown in this image, or use a custom solution. Keep in mind that walls can be a little uneven if you run the doors against the wall, which can cause damage.

- Product information page
SKYTTA planner
Once you have measured everything and have a rough idea of what you want, you can continue puzzling in the digital SKYTTA planner. There you can see what the panels look like in a virtual space. You can also write down the desired products on a shopping list, which you can order in the store or add to the online shopping cart.
Montage videos
Installation of rails

Installation of doors

Demontage of doors
10 year warranty on SKYTTA
Our SKYTTA products have been extensively tested for strength and durability. This gives us confidence in the quality, which is confirmed by a 10-year warranty
Read more


